When it comes to security there is always the concerns about the security of the ESXi hypervisor. Its always the hypervisor that is nominated as the layer that can’t be trusted within the IT infrastructure. The whitepaper by Mike Foley tries to give you more insight on how the VMware ESXi hypervisor from a security perspective and what things to look at when securing the hypervisor.
The topics covered in the white paper are:
Secure Virtual Machine Isolation in Virtualization
Not something you will be dealing with during normal day-to-day vSphere operations, but you can bump into problems if you don’t have a scratch partition.
This happened to me while upgrading some ESXi host with VMware Update Manager, but can also happen when you are trying to generate log files for VMware Support. And what’s more annoying then having system log generation problems when trying to deal with another error in your vSphere environment.
What is the ESXi scratch partition?
The scratch partion is a 4 GB VFAT partition that is created on a target device that has sufficient space available and is considered “Local” by ESXi.
The scratch partition is used for a couple of things:
* Store vm-support output (if scratch partition is unavailable the output will be stored in memory)
* During first boot the partition will be configured through syslog for retaining logfiles
* Userworld swapfile (when enabled)
The scratch partition is created and configured during ESXi installation or the autoconfiguration phase when the ESXi server first boots.
ESXi selects one of these scratch locations during startup in order of preference:
1. The location configured in the /etc/vmware/locker.conf configuration file, set by the ScratchConfig.ConfiguredScratchLocation configuration option
2. A Fat16 filesystem of at least 4 GB on the Local Boot device.
3. A Fat16 filesystem of at least 4 GB on a Local device.
4. A VMFS Datastore on a Local device, in a .locker/ directory.
5. A ramdisk at /tmp/scratch/
There are two examples where scratch space may not be automatically defined on persistent storage. In each case, the temporary scratch location will be configured on a ramdisk.
1. ESXi deployed on a Flash or SD device, including a USB key. Scratch partitions are not created on Flash or SD storage devices even if connected during install, due to the potentially limited read/write cycles available.
2. ESXi deployed in a Boot from SAN configuration or to a SAS device. A Boot from SAN or SAS LUN is considered Remote, and could potentially be shared among multiple ESXi hosts. Remote devices are not used for scratch to avoid collisions between multiple ESXi hosts.
So for the record, a scratch partition isn’t always created, and even isn’t required to run ESXi, but it can result in strange problems during vSphere operations. So better be safe, then sorry and create your scratch partition in advance.
Always have a scratch partition
The reason for this article is the fact that I ran into trouble while updating my ESXi host with VMware Update Manager. This was due to the fact that my servers had SAS disks and no scratch partition was configured. This led to this VMware KB article which explained how to configure your scratch partition by setting the advanced option ScratchConfig.ConfiguredScratchLocation.
This solved my problem and I’ve made it a best practice to configure my scratch partition, by setting ScratchConfig.ConfiguredScratchLocation, in my kickstart script. The scratch partition is to be located on the local VMFS datastore of my server. After all ESXi creates this local VMFS datastore from the disk space that isn’t used (when dealing with servers with local disks). This remaining disk space is more then enough to host the scratch partition. This way the scratch partition persistent and is always created, even in the case of local SAS disks.
For more information, and the sources of all my information for this article, have look at the following links:
Since vSphere 4.1 VMware has enabled Active Directory integration for ESXi into the GUI. This is a nice feature to elevate your security and make sure that your AD can be used for authentication on the ESXi host.
As with all computer account your need to be sure that the following is correct :
* DNS is configured properly on the ESXi host and can resolve AD
* ESXi host has a FQDN name and can be resolved by DNS (also correct reverse DNS lookup!)
* Time in sync with AD server for Kerberos
You can configure the directory services in the GUI by accessing the Host Configuration –> Authentication Services and then clicking the Properties. A configuration box will pop up and it will ask you for the properties for your Active Directory service.
Note ! If you want your ESXi host to be put into a specific directory in your Active Directory you’ll need to put the OU directory structure after the domain name. In my case devtest.local/Servers/ESXi in which the ESXi hosts reside in directory ou=Servers,ou=ESXi.
Next you will be asked for domain credentials (please use account@domain.suffix) with privilege to join computer account to the domain.The right credentials will add your ESXi host to Active Directory.
This morning I read the post by Gabe on his blog about ESXi on USB devices here. Coincidentally I’m taking a look at the ESXi installation of the HP BL460c G7 using kickstart. The installation process is explained in this post. This HP BL460c G7 blade server has two types of media to install ESX I to : SD or SSD. In this post I’ll try to explain what problems I ran into and my take on VMware not supporting the installation on SD / USB.
No scripted install to USB / SD device
Before getting into details : scripted install to USB (or SD which ESXi sees as a USB device) isn’t supported by VMware. This KB article by VMware explicitly says that you can’t install ESXi via scripted install.
“You cannot use Scripted Install to install ESXi Installable to a USB device”
Question however is : Why is this not supported? It’s not a technical issue. You can install ESXi to a USB / SD device when you install ESXi manually. And with kickstart you should be able to pinpoint the installation device to the USB / SD device. So why doesn’t VMware support the installation via scripted install to the USB / SD device?
I can only guess for the reason why. Haven’t found the answer to that question anywhere and would love to know. The only thing I can do is guess. My opinion about it is that is has something to do with embedded ESXi vs. installed ESXi.
Since it’s not technical issue, it must have some other reason. Just think when it would be possible to kickstart your ESXi installation to a USB / SD device, it would practically make the ESXi embedded solution obsolete. You just buy your servers with a non-installed USB device / SD card and install your own version of ESXi onto the USB / SD disk via kickstart. No need anymore for a the vendor specific ESXi embedded version.
Also taking into account the fact that most vendors are moving away from the ESXi embedded solution (for example HP discontinued ESXi embedded) , makes you wonder even more : Why can’t I install ESXi to a USB / SD device?
Making a choice : SD vs. SSD
So why, if VMware doesn’t support it, do you want to install to an SD device. Most server vendors currently install a SD slot into their server for the purpose of installing an OS onto a SD card. This gives you an installation method besides installing onto SSD disks.
From a cost perspective this is a huge benefit. For example an SD card for the HP BL460c G7 will cost you about 80 euros. An SSD disk in that same server will cost about 800 euros. Which in my opinion is a big difference in price if you take into account that the underlying technology (flash) is basically the same.
But from a redundancy design point of view it would be better to use the SSD disk. You will be able to put them in a RAID configuration. Which would prevent a single-point-of-failure in the server in case one of the SSD disks fails. Most server vendors don’t have a solution to make SD redundant. The only solution I know is the Dell Internal Dual SD module. So basically it’s an advantage of SSD over SD when looking at redundancy.
But you can also question that when you ask yourself what failure rate is to be expected of flash disks (SD or SSD) versus traditional HD disk. In general flash disks are more stable then traditional disks. More risk probably comes from a bad batch of SD or SSD disks than from a SD / SSD disk failing due to a technical error.
Then again if ESXi hosts fail, you always have VMware High Availability (HA) to kick in and save the day.
Conclusion
The choice of SD vs. SSD comes down to the same old design mantra : It depends.
The choice should be made based on the requirements that your vSphere design has to meet. It is based on the down time your company is willing to except. If it’s not a problem for VMs to go down for a couple of minutes then SD can be your preferred solution. If availability is key then you should go for the RAID SSD solution. Availability will cost you money as always.
But back to reality. SD isn’t supported with scripted install. So I had no choice. SSD it’s going to be. I do however regret that I don’t have the option to choose. I would like to see VMware supporting the kickstart scripted install for ESXi so I do have the option to install on USB / SD via scripted install.
VMware released an excellent whitepaper on troubleshooting performance problems in vSphere 4.1. It really is a great resource and start point for anyone who has performance issues in his / her vSphere infrastructure.
The steps discussed in the document use performance data and charts readily available in the vSphere Client and esxtop to aid the troubleshooting flows. Each performance troubleshooting flow has two parts:
1. How to identify the problem using specific performance counters.
2. Possible causes of the problem and solutions to solve it.
Quote for the Introduction of the Performance Troubleshooting for vSphere 4.1 whitepaper :
Performance problems can arise in any computing environment. Complex application behaviors, changing demands, and shared infrastructure can lead to problems arising in previously stable environments. Troubleshooting performance problems requires an understanding of the interactions between the software and hardware components of a computing environment. Moving to a virtualized computing environment adds new software layers and new types of interactions that must be considered when troubleshooting performance problems.
Proper performance troubleshooting requires starting with a broad view of the computing environment and systematically narrowing the scope of the investigation as possible sources of problems are eliminated. Troubleshooting efforts that start with a narrowly conceived idea of the source of a problem often get bogged down in detailed analysis of one component, when the actual source of problem is elsewhere in the infrastructure. In order to quickly isolate the source of performance problems, it is necessary to adhere to a logical troubleshooting methodology that avoids preconceptions about the source of the problems.
The document can be found here. Source is the blog post from the VMware VROOOM! Blog.
So you have to deploy ESXi and think about automating the installation. Then the kickstart file is going to be your new best friend. It’s a think once, apply many concept to deploy ESXi to your hardware.
At the moment I’m building an vSphere 4.1 infrastructure with 300+ HP blades. All need to be migrated from ESX 3.5 to ESXi 4.1. This requires a new installation of ESXi. I’m using kickstart to automate the installation process and to get a consistent installation state when deploying ESXi.
ESXi deployment options
In general there are 2 options if you want to install ESXi : interactive and scripted. As you will probably understand, kickstart is the core of the scripted installation. The kickstart.cfg file is the file that contains the configuration settings for your ESXi installation and more.
The picture below shows the different options you have for installing ESXi onto your hardware.
Both installation method use either CD or PXE to install ESXi. The key difference is the kickstart file. The most commonly used scripted installation is the PXE method. With PXE you boot your server into a PXE image which deploys your ESXi from a media depot hosted through HTTP(S), FTP or NFS. This media in combination with your kickstart file will created a custom ESXi server.
Deployment tool
For the deployment I have been using HP Insight Control Server Deployment 6.2 (former HP Rapid Deployment Pack (RDP)) an OEM version of Altiris Server Deployment 6.9. As far as I know the only commercial tool at the moment that supports ESXi 4.1 deployment.
There are however also two freeware appliances available for PXE ESXi deployment. Ultimate Deployment Appliance (UDA) and ESX Deployment Appliance (EDA) can be downloaded from the VMware Virtual Appliance Marketplace. But you can also take a look at the ESXi Installable and vCenter Server Setup Guide which gives good leads on building your own PXE deployment solution.
HP Insight Control Server Deployment presents you with a workflow tool to deploy a server. The workflow can be created by adding scripts to installation jobs. HP creates specials deployment packs for OS installations. Also one for ESXi 4.1 which has the following 4 jobs in them :
1. Configure BIOS (Very handy to set those BIOS settings for virtualization!)
2. Deploy GRUB image
3. Configure GRUB image
4. Create kickstart file based on default kickstart script
This deployment pack generally gives you a basic installation of ESXi if you don’t edit the kickstart file. The only thing you have to do afterwards is assign the job to a specific HP server and it will install ESXi out-of-the-box.
Kickstart file
The kickstart file below is used in conjunction with HP Insight Control Server Deployment. This tool has a database with all the configuration variables per server object. The @@VARIABLES@@ in the kickstart script below are replaced each time the installation job is executed.
This creates a server specific kickstart file for each server in your server park.
The lines until %firstboot are created to install ESXi. All commands after that line will be executed after the ESXi host has booted for the first time.
For more information about the specific commands in the kickstart file :
#————————————————————————-
# Customer default Kickstart for ESXi 4.1.x
# Created by : Martijn Baecke
# Date : 26-01-2011
# Summary : This kickstart script is used for the installation of
# ESXi using HP Insight Control Server Deployment 6.2
#————————————————————————-
########### Start : Networking ###########
# Add vMotion portgroup to vSwitch0
esxcfg-vswitch -A “vMotion Network” vSwitch0
# Add vmnic3 to vSwitch0
esxcfg-vswitch -L vmnic3 vSwitch0
# Add IP address to vMotion vmk1
esxcfg-vmknic -a -i @@VMOTIONIP@@ -n @@VMOTIONNETMASK@@ -p “vMotion Network”
# Assign VLAN to vMotion Network portgroup
# esxcfg-vswitch -v XX -p “vMotion Network” vSwitch0
sleep 10
# Set vMotion to vmk1
vim-cmd hostsvc/vmotion/vnic_set vmk1
# Set security policy to reject on vSwitch0
vim-cmd hostsvc/net/vswitch_setpolicy –securepolicy-promisc=0 vSwitch0
vim-cmd hostsvc/net/vswitch_setpolicy –securepolicy-macchange=0 vSwitch0
vim-cmd hostsvc/net/vswitch_setpolicy –securepolicy-forgedxmit=0 vSwitch0
# Set NIC order policy for portgroups on vSwitch0
vim-cmd hostsvc/net/portgroup_set –nicorderpolicy-active=vmnic0 –nicorderpolicy-standby=vmnic3 vSwitch0 “Management Network”
vim-cmd hostsvc/net/portgroup_set –nicorderpolicy-active=vmnic3 –nicorderpolicy-standby=vmnic0 vSwitch0 “vMotion Network”
# Set failback to No for portgroups on vSwitch0
vim-cmd hostsvc/net/portgroup_set –nicteaming-rollingorder=1 vSwitch0 “Management Network”
vim-cmd hostsvc/net/portgroup_set –nicteaming-rollingorder=1 vSwitch0 “vMotion Network”
############ End : Networking ############
########### Start : Storage ###########
# Configure local datastore with different label
vim-cmd hostsvc/datastore/rename datastore1 “$(hostname -s)-local-storage”
# Set Round Robin (RR) as default PSP for VMW_SATP_SYMM (EMC devices)
esxcli nmp satp setdefaultpsp –satp VMW_SATP_SYMM –psp VMW_PSP_RR
# Set Round Robin (RR) for all EMC devices
EMC_DEVICES=`esxcli nmp device list | grep ‘EMC Fibre Channel Disk’| awk {‘print $NF’}| sed -e ‘s/[()]//g’`
for i in $EMC_DEVICES;do esxcli nmp device setpolicy -d $i -P VMW_PSP_RR; done;
# Set Round Robin (RR) for all HDS devices
HDS_DEVICES=`esxcli nmp device list | grep ‘HDS Fibre Channel Disk’| awk {‘print $NF’}| sed -e ‘s/[()]//g’`
for i in $HDS_DEVICES;do esxcli nmp device setpolicy -d $i -P VMW_PSP_RR; done;
# Determine if this is a cluster with EMC or HDS storage. Cluster with mixed storage not allowed! If mixed EMC settings apply!
if [ -n “$HDS_DEVICES” ]; then
# This is a cluster with HDS storage
# Queue depth for HDS remains default = 32
# If this needs to change unquote following lines. Replace YY with value
# esxcfg-module -s ql2xmaxqdepth=YY qla2xxx
# vim-cmd hostsvc/advopt/update Disk.SchedNumReqOutstanding long YY
# Enable VAAI for HDS
vim-cmd hostsvc/advopt/update DataMover.HardwareAcceleratedMove long 1
vim-cmd hostsvc/advopt/update DataMover.HardwareAcceleratedInit long 1
vim-cmd hostsvc/advopt/update VMFS3.HardwareAcceleratedLocking long 1
else
# This is a cluster with EMC storage
# Set queue depth to 64
esxcfg-module -s ql2xmaxqdepth=64 qla2xxx
vim-cmd hostsvc/advopt/update Disk.SchedNumReqOutstanding long 64
fi
############ End : Enable Management Traffic ############
########### Start : Enable SSH Tech Support Mode ###########
# Only enable this when doing testing with kickstart!
# Default = disable by using # in front of commands
There are several ways to add additional drivers to ESXi. This can sometimes be necessary when implementing a new type of servers. So if you have a device that isn’t supported by the default installation of ESXi a driver needs to be added after the installation.
This post will describe how to add an additional drivers to ESXi with update manager. It can also be done via the vCLI which is described by the guys at VMGuru.nl here.
The additional drivers that are available to ESXi can be downloaded from the vSphere download page under the tab Drivers & Tools. All downloads will be delivered in ISO format.
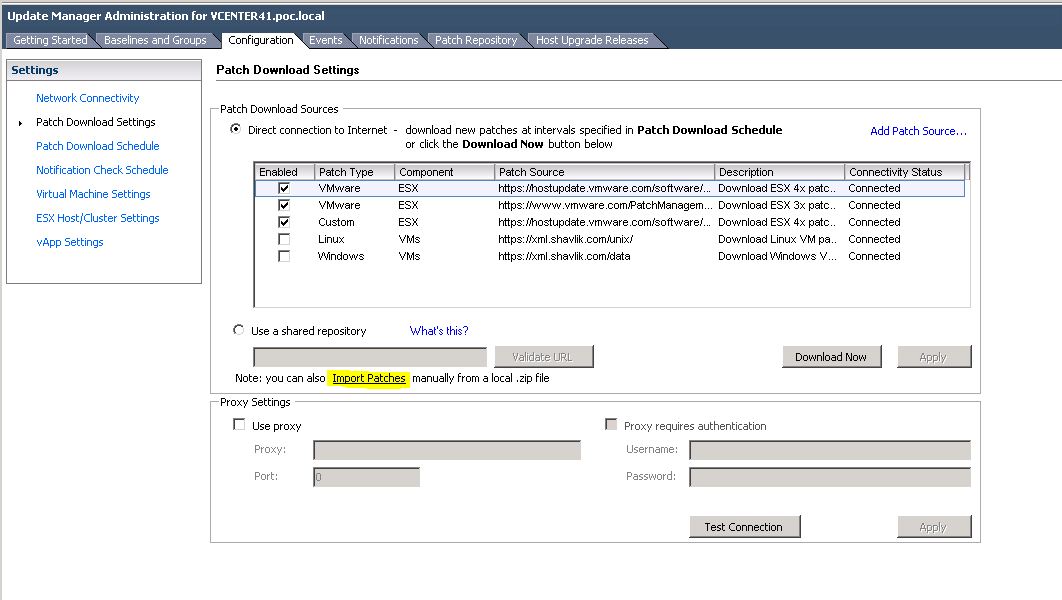
The ISO includes a zip file that contains the (offline-bundle) additional driver. The additional driver will be available in zip-file which can be imported under Configuration -> Patch Download Settings in VMware Update Manager. There is a note (see picture in yellow) with a link to “Import Patches”.
This will start a proces of importing the additional update into Update Manager. After this the update will be available in your repository. After which you can create a baseline and patch your ESXi hosts.
For more information on how to patch your ESXi host with baselines and remediation see the following video :
ESXi is the small footprint hypervisor created by VMware. It can be implemented on bare-metal servers and is used to host virtual machines. It can be managed by vCenter and is supported by all other VMware product.
So as far as the above few lines state, it is the same as VMware’s “thick” hypervisor : ESX. And there are even some advantages which the “thin” ESXi has over ESX, being :
It’s “thin”; As I already stated above, ESXi is a small footprint installation. 32 Mb(!!!) agains approx. 2~3 Gb.
Quick install; Boot,accept license, choose disk, install, run. A simple installation method to install it on your server. You can even use a USB drive to boot from.
Easy update; Updating ESXi can be compared to flashing a BIOS. Because it’s such a small footprint, just download the newest version and replace the current one. Fast and easy.
Simple configuration menu; ESXi comes with a simple configuration menu (again BIOS like) which provides you with all the options you can configure in ESXi. No more service console!
More secure; ESXi having such a small footprint (less patches!) and having no external communication interface (CLI for example) except for VC / RCLI makes it more secure then ESX.
Ok, so why don’t we all switch to this small and practicle hypervisor? Well there are some disadvantages which can withhold you from implementing ESXi in a IT production environment, being :
Service console is gone; For people already working with the fat ESX : No more service console.Which can be a disadvantage if your IT department frequently uses the command line.
No central unattended distribution method; You can’t install ESXi unattended. Which is something you want if you have a large VI. Currently there are no unattended distribution methods as far as I know.
Can’t install local agents; There is no service console anymore. So you can’t use local agents on your ESXi host. Everything needs to be able to communicate with the VI API or any other remote connect method to gather information.
Conclusion : ESXi is very suitable for corporate production environment. ESXi has the same functional specs as ESX; you can host virtual machines on it and it can be managed using vCenter. However ESXi has advantages and disadvanstages over ESX. Every environment needs to be evaluated if ESXi is suited for it. If currently you are still dependent on something ESXi can’t provide, for example agent in service console, then continue using ESX.
But switching to ESXi is the future! So if you decide not to switch now, prepare yourself for the future. Start using ESXi in your test environment, gain experience. Communicate current flaws to VMware and your third party tooling / hardware vendors. They can make this product better with your input!
For more information look at following links. There is a lot of information about ESXi. Read it and make your decision.
Update: When using ESXi you can install agents in VMware’s VIMA. Which also can be used to run the esxcfg commands (Thanx for the additional info goes to Duncan Epping)


